Enhancing Raspberry Pi Projects with Radar Modules
Add radar modules to Raspberry Pi projects for privacy-safe motion and presence sensing. Wiring, serial data parsing and automation ideas for makers.
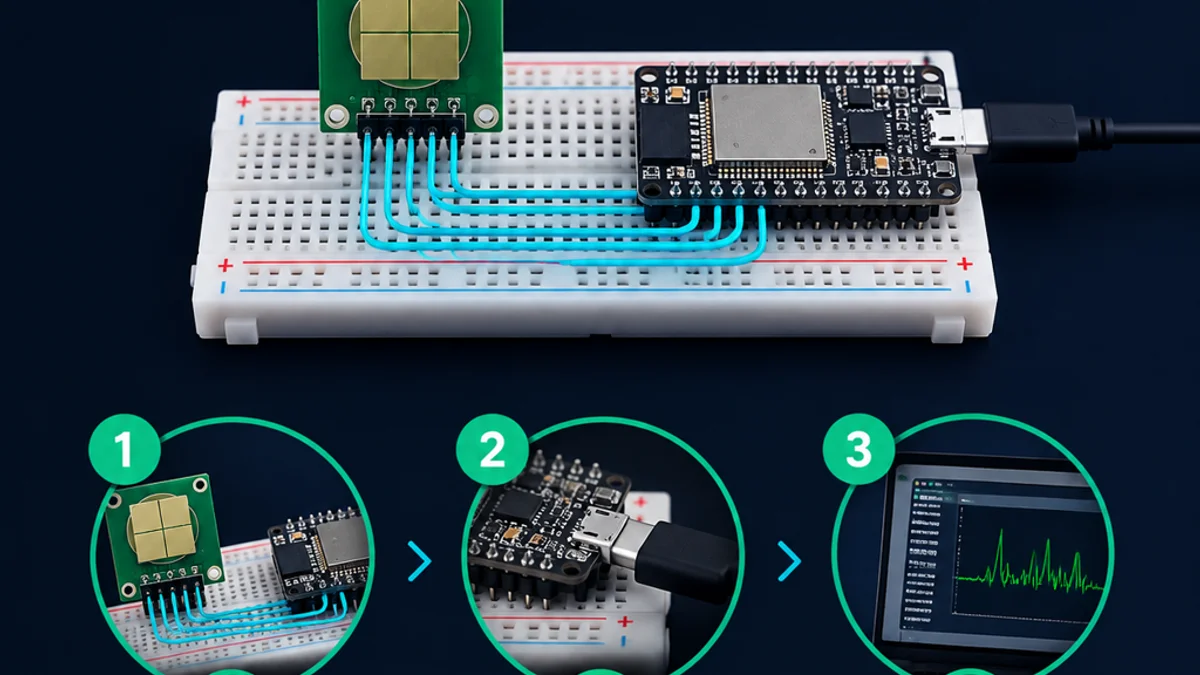
Radar modules can add a new layer of awareness to Raspberry Pi projects, especially when cameras, PIR sensors, or ultrasonic sensors are not the right fit. They detect motion, presence, distance, or speed by transmitting radio waves and reading the reflected signal, which makes them useful in automation, robotics, occupancy sensing, security, and experimental measurement projects. If you are comparing raspberry pi sensors, radar deserves attention because it can work in low light, tolerate some environmental challenges, and provide different data than vision-based systems.
What can a radar module do with a Raspberry Pi?
A radar module connected to a Raspberry Pi can help a project detect movement, sense human presence, estimate distance, measure speed, or trigger actions when something enters a defined area. The exact capabilities depend on the module, its frequency band, interface, onboard processing, antenna design, and software support. In practical terms, a radar module raspberry pi setup can turn a small single-board computer into a smarter sensor hub that reacts to activity without relying on visible light.
That makes radar appealing for projects where a camera feels excessive, invasive, or unreliable. A hallway occupancy monitor does not need to identify a person; it only needs to know whether someone is present. A garage safety system may care more about movement near a door than about capturing video. A robot might use radar as one part of its navigation stack, alongside other raspberry pi sensors that fill in the gaps.
Radar also gives makers room to experiment. Some modules output a simple digital signal when motion is detected, while others provide richer data over UART, I2C, SPI, or USB. The simple versions are great for beginners; the advanced versions support filtering, zone configuration, point clouds, range bins, or speed information, depending on the device.

Why radar belongs in the Raspberry Pi sensor toolkit
The Raspberry Pi ecosystem is full of familiar sensors: temperature probes, light sensors, ultrasonic distance modules, accelerometers, cameras, PIR motion detectors, and more. Radar does not replace all of them, but it brings a different sensing method to the table. Instead of waiting for infrared heat changes or measuring reflected sound, radar uses radio waves, which gives it strengths that are useful in real-world builds.
A raspberry pi radar project can be less dependent on lighting than a camera-based project. It can also detect movement without requiring the target to emit heat in the same way a PIR sensor does. Some radar modules can sense small motion, such as breathing or subtle body movement, making them useful for presence detection where a basic motion sensor might time out when someone sits still.
There is also a privacy advantage. Radar can detect that a person is present without capturing a recognizable image. For home automation, office occupancy, smart lighting, and general room-state detection, this can be a more comfortable approach than placing cameras in shared spaces.
Still, radar is not magic. It may detect motion through thin materials, reflect from unexpected surfaces, or require careful tuning to avoid false triggers. The value comes from choosing the right module and designing the project around what radar does well.
Common types of radar modules for Raspberry Pi projects
Radar modules vary widely, from inexpensive motion detectors with a single output pin to sophisticated millimeter-wave sensors with configurable zones and processed data streams. Before buying hardware, it helps to know the broad categories.
Simple microwave motion sensors
Basic microwave radar motion sensors are often used as alternatives to PIR sensors. Many of them provide a digital output that changes state when motion is detected. This makes them easy to connect to a Raspberry Pi GPIO pin, provided the voltage levels are compatible.
These modules are attractive because they are inexpensive, compact, and beginner-friendly. They are best for projects that only need a yes-or-no motion signal: turn on a light, wake a display, log activity, or trigger an alert. The tradeoff is that they usually offer limited control over range, sensitivity, and target information.
Because radar waves can reflect and pass through some materials, placement matters. A module hidden behind a plastic enclosure may still work, while the same module facing a metal surface may behave unpredictably. Testing in the actual installation area is more useful than relying on a desk demo.
Presence detection radar modules
Presence detection modules are designed to identify whether someone remains in an area, even with very little movement. These are useful for lighting, HVAC control, room occupancy dashboards, desk presence indicators, and accessibility projects.
Compared with a simple motion detector, a presence module may expose configuration options such as detection zones, sensitivity levels, timeout behavior, or near/far detection gates. Many communicate through UART, which is convenient on a Raspberry Pi once serial access is configured properly. Some modules include vendor tools for initial setup, although long-term integration usually depends on documented commands or open-source libraries.
For a reliable presence project, think beyond the sensor itself. The room layout, mounting angle, furniture, airflow from fans, moving curtains, and reflective objects can all influence behavior. A good installation often starts with conservative sensitivity, followed by gradual tuning.
FMCW and mmWave radar modules
Frequency-modulated continuous-wave radar and millimeter-wave modules are often used when a project needs more than a simple trigger. Depending on the module, they may provide distance estimates, velocity data, angle information, or multiple detected points. These are the modules most people imagine when they talk about advanced raspberry pi radar experiments.
They can be powerful, but they are not always plug-and-play. You may need to parse serial frames, handle binary protocols, configure detection profiles, and filter noisy data. Some modules use companion boards or USB interfaces, while others expect embedded development knowledge.
For robotics, people counting, short-range tracking, safety zones, and gesture-style experiments, these modules are worth exploring. For a simple cupboard light, they are probably more complexity than you need.
Doppler radar modules
Doppler radar modules are commonly used to detect movement and estimate speed by measuring frequency shifts in the reflected signal. They can be interesting for projects involving moving objects, model vehicles, rotating equipment, or directional motion experiments.
The Raspberry Pi can log and process the module output, but some Doppler modules produce analog signals that need extra electronics before the Pi can read them. Since standard Raspberry Pi boards do not include analog input pins, an analog-to-digital converter may be required. This is a common point of confusion for beginners: if the sensor outputs analog voltage, the Pi needs help interpreting it.
How radar compares with other Raspberry Pi sensors
Radar is best understood as one option in a broader sensing toolkit. It shines when light-independent motion or presence detection matters, but other sensors may be simpler, cheaper, or more precise for specific jobs.
Consider these practical comparisons:
- Radar versus PIR: PIR sensors are simple and low-cost, but they detect changes in infrared radiation and can miss a person who remains still. Radar can be better for continued presence detection, depending on the module.
- Radar versus ultrasonic sensors: Ultrasonic modules are useful for distance measurement, especially in controlled settings, but sound can be affected by angle, soft materials, and environmental noise. Radar may perform better in some applications, though it can introduce its own reflection challenges.
- Radar versus cameras: Cameras provide rich visual information, object recognition potential, and human-readable footage. Radar offers less visual detail but can be more privacy-friendly and lighting-independent.
- Radar versus LiDAR: LiDAR can be excellent for distance mapping, but modules vary in cost, range, and environmental tolerance. Radar may be more suitable where dust, darkness, or privacy concerns make optical sensing less attractive.
- Radar combined with other sensors: The strongest projects often use sensor fusion. A radar module might detect presence, while a light sensor checks ambient brightness and a temperature sensor informs climate control.
This is where Raspberry Pi is especially useful. It can collect data from multiple raspberry pi sensors, run scripts, host dashboards, publish MQTT messages, control relays, and connect to home automation platforms. Radar becomes more valuable when the Pi can combine it with context.
Choosing the right radar module
The best radar module is not necessarily the most advanced one. It is the one that matches your project goal, wiring comfort level, software skills, enclosure, and environment. Start by defining the problem in plain language: “I need to know when someone is still sitting at a desk,” or “I need to detect motion near the garage door,” or “I want to estimate the distance of objects in front of a small robot.”
Once the job is clear, evaluate modules using a practical checklist:
- Output type Decide whether you need a simple digital trigger or detailed data. Digital output is easiest. UART or USB data is more flexible. Analog output may require an ADC.
- Voltage compatibility Raspberry Pi GPIO pins are not 5V tolerant. If a module outputs 5V logic, use level shifting or choose a module with 3.3V-compatible signaling.
- Interface support Check whether the module uses GPIO, UART, I2C, SPI, USB, or analog output. Make sure your Raspberry Pi model has the needed pins or ports available.
- Documentation quality Good documentation matters. Look for wiring diagrams, command references, sample code, configuration tools, and clear descriptions of output data.
- Detection goal Motion detection, presence detection, speed measurement, and distance sensing are different tasks. Do not assume every radar board can do all of them.
- Mounting and field of view Think about where the module will sit, what direction it will face, and whether nearby materials may block or reflect signals.
- Power needs Some modules can be powered from the Pi, while others may need a separate stable supply. Unstable power can create frustrating behavior that looks like bad code.
- Software ecosystem A popular module with community examples may be easier than a technically superior module with sparse documentation.
Wiring and setup basics
A simple radar module raspberry pi build usually starts with power, ground, and one or more signal connections. For a digital motion module, the output pin can often be connected to a GPIO input, while the script watches for state changes. For UART modules, the Pi communicates over transmit and receive pins, or through a USB-to-serial adapter.
Before connecting anything, confirm the module’s voltage requirements and logic levels. Many Raspberry Pi problems begin with assuming that “it fits on the pin” means “it is electrically safe.” A 5V supply pin may be available on the Pi header, but that does not mean a 5V signal should be sent into a GPIO input.
A typical setup process looks like this:
- Read the module datasheet or product notes. Identify the power voltage, output voltage, interface, pin labels, and any boot or configuration requirements.
- Plan the connection before powering the Pi. Draw a quick pin map so VCC, GND, TX, RX, and output pins are not confused.
- Use level shifting if needed. Protect the Pi’s GPIO when a module uses higher logic voltage.
- Enable the required interface. UART, I2C, and SPI may need to be enabled in Raspberry Pi configuration settings.
- Test with a minimal script. Confirm that you can read a signal or receive serial data before building the full application.
- Log raw behavior. Save timestamps or incoming frames so you can see patterns, false triggers, and missed detections.
- Tune in the real locati0n. Final sensitivity and placement should be tested where the project will actually run.

For beginners, it is wise to start with a breadboard or temporary jumper wiring, then move to a more secure connection once the design works. Loose wires can create intermittent errors that are hard to distinguish from sensor noise. If the project will run continuously, consider strain relief, a case, and a clean power supply.
Software ideas for Raspberry Pi radar projects
The software layer is where radar becomes useful instead of merely interesting. A sensor that detects motion can trigger a log entry, send a notification, switch a relay, publish an MQTT message, update a web dashboard, or feed data into a larger automation system.
For a basic digital-output module, the script can watch a GPIO pin and respond when the signal changes. Add debouncing or time thresholds so the project does not react to every flicker. For example, a smart light should probably turn on quickly when presence is detected, but wait a little before turning off to avoid annoying users.
For UART or USB radar modules, software may need to parse structured messages. Some modules send readable text; others send binary frames. The project may need to extract values such as detection state, distance, energy level, speed, or zone number. Once parsed, the Raspberry Pi can transform the data into simple decisions.
Useful software patterns include:
- Event logging: Record when motion starts and stops, then review activity patterns later.
- State machines: Track states such as empty, occupied, recently occupied, and uncertain.
- Threshold filtering: Ignore weak detections or require repeated readings before triggering an action.
- MQTT publishing: Send radar events to home automation systems or dashboards.
- Local web interfaces: Show live sensor status from the Raspberry Pi on a browser.
- Data smoothing: Average or filter readings to reduce jitter in distance or presence values.
- Fail-safe behavior: Decide what should happen if the sensor disconnects or data becomes invalid.
Python is a common choice because it is approachable and well supported on Raspberry Pi. However, the best language depends on your project. Node-RED, C++, Go, or shell scripts may also make sense, especially if the sensor already has community examples.
Project ideas that make good use of radar
Radar works best when its strengths match the problem. The following project ideas are realistic starting points, and each can be expanded with other raspberry pi sensors as your skills grow.
Room occupancy monitor
A Raspberry Pi can use a presence radar module to estimate whether a room is occupied and then publish the status to a dashboard or automation system. This is useful for smart lighting, energy-saving routines, shared workspace indicators, or quiet home monitoring. Compared with a camera, radar can keep the project focused on presence rather than identity.
The key is to avoid overreacting. A good occupancy monitor should include timeouts, confidence thresholds, and manual override options. If the room has fans, pets, moving curtains, or reflective surfaces, tune the sensor gradually.
Smart desk or workstation sensor
A desk presence project can detect whether someone is seated and use that state to control a monitor light, focus indicator, time tracker, or “do not disturb” display. A radar sensor may perform better than a simple motion detector when a person sits still for long periods.
This is also a good project for learning about sensor placement. Mounting the module under the desk, behind a small plastic panel, or near a monitor can produce different results. Testing several positions will teach you more than any generic wiring guide.
Garage or doorway activity detector
Radar can detect motion in places where lighting changes, shadows, or darkness make camera-based detection less appealing. A Raspberry Pi can log movement near a garage door, send alerts, or turn on task lighting when activity begins.
For this use case, reduce false triggers by narrowing the detection area as much as the hardware allows. If the module sees the street, trees, or passing vehicles, the project may become noisy. Mounting angle and sensitivity are often more important than code.
Robot awareness and obstacle support
A mobile robot can use radar as one sensing input for detecting movement or obstacles. Radar should not be treated as the only navigation sensor, but it can complement bump switches, ultrasonic sensors, encoders, cameras, or LiDAR.
The challenge is interpretation. Reflections, multipath, and field-of-view limits can create ambiguous data. For robotics, it is better to start with logging and visualization before letting radar directly control motion.
Non-contact experimentation and learning
Radar is also simply a fascinating way to learn. You can explore how different materials reflect signals, how angle affects detection, or how moving objects appear in sensor output. A Raspberry Pi makes it easy to collect readings over time and graph them.
This kind of project is especially valuable for students and hobbyists because it connects electronics, physics, programming, and data analysis. Even a basic experiment can build intuition that helps with more ambitious builds later.
Common pitfalls and how to avoid them
Most radar project frustrations come from assumptions. A module may work beautifully on the bench and behave differently in the final enclosure. A script may look broken when the real issue is voltage compatibility. A sensor may appear too sensitive when it is actually pointed at a reflective or moving object.
Use this troubleshooting checklist when a raspberry pi radar project behaves unexpectedly:
- Check power first. Confirm the module receives the voltage and current it needs. Try a stable supply and shorter wires if readings are erratic.
- Verify logic levels. Protect the Pi from 5V signals and confirm the output voltage is readable as a valid high or low.
- Test one feature at a time. Read raw GPIO or serial data before adding automation, alerts, dashboards, or cloud services.
- Move the sensor. A small change in angle or height can dramatically change what the radar “sees.”
- Watch for reflective surfaces. Metal, appliances, shelving, and some building materials can create unexpected reflections.
- Account for pets and moving objects. Fans, curtains, doors, plants, and animals can all influence detection.
- Add software delays. Use hold times, cooldown periods, and repeated-confirmation logic to reduce flicker.
- Review documentation again. Some modules have configuration modes, startup delays, or command sequences that are easy to miss.
The best mindset is experimental. Radar sensing is shaped by environment, so a little patience during placement and tuning can save hours of unnecessary software changes.
Designing for reliability and privacy
Reliability starts with clear boundaries. Decide what your project should detect, what it should ignore, and what action should follow each state. A hallway light can tolerate occasional imperfection; a safety-related project needs much more caution, redundancy, and testing.
If your project affects comfort or security, avoid making radar the single source of truth too early. Combine it with other raspberry pi sensors, manual controls, or confirmation logic. For example, a room automation system might use radar for occupancy, a light sensor for ambient brightness, and a physical switch for override.
Privacy is another reason radar is attractive, but it still deserves thoughtful design. Even without images, occupancy data can reveal patterns about people’s routines. Store only what you need, secure dashboards and APIs, and be transparent with anyone who shares the monitored space.
Good projects also fail gracefully. If the Raspberry Pi restarts, the sensor disconnects, or the script crashes, the system should return to a safe default. That might mean leaving a light manually controllable, marking occupancy as unknown, or sending a maintenance alert rather than silently making bad decisions.
A practical path for beginners
If you are new to radar, do not start with the most advanced module and a complicated automation goal. Start with a small, observable success. Read a motion signal, print timestamps, blink an LED, or publish a simple message when detection changes.
A beginner-friendly learning path might look like this:
- Start with a simple digital radar motion module. Learn safe wiring, GPIO input, and basic event detection.
- Add logging. Save detection times so you can understand sensor behavior over hours or days.
- Build a small automation. Trigger an LED, buzzer, display message, or local notification.
- Experiment with placement. Test the same code in different rooms, angles, and enclosures.
- Move to a configurable presence module. Learn UART communication and tuning options.
- Combine sensors. Add light, temperature, door, or button inputs for smarter decisions.
- Explore advanced radar data. Try distance or speed sensing once you are comfortable parsing and filtering data.
This path keeps the learning curve manageable. Each step teaches a skill that transfers to more complex Raspberry Pi projects.

Final takeaway
Radar modules open up creative possibilities for Raspberry Pi builds, from simple motion triggers to more advanced presence, distance, and speed-aware systems. They are especially useful when you want sensing that is less dependent on light, less visually invasive than a camera, and different from the usual raspberry pi sensors.
The most successful projects begin with a clear goal, a compatible module, safe wiring, and patient testing in the real environment. Whether you are building a smart room, a garage monitor, a desk presence indicator, or an experimental raspberry pi radar setup, radar is worth exploring because it adds a practical and fascinating way for your Pi to understand the world around it.
Not sure which sensor fits your project?
Talk to our mmWave application engineers for a free consultation.
Specify your hotel project with our engineers
Send your room count, ceiling type, and protocol preference. We will return a sample plan and quote within 24 business hours.
- Move from general guidance into a product or application discussion.
- Use RFQ when pricing, drawings, MOQ, or launch timing needs structure.
- Keep a direct contact path visible for fast clarifications and handoff.